
cPanel Quick-Start
So, you have a Yohost hosted cPanel server, now what?
cPanel can be pretty confusing if you’ve never worked with a web-based control panel before. Most guides are written for those with a web hosting background by tech gurus with little concern for the uninitiated. If, like many, you’re part of the latter, this guide is for you.
cPanel Basics
cPanel is a web-based control panel where you can manage everything you need to host a website, including convenient extras like email, FTP (File Transfer Protocol) accounts, and DNS (Domain Name Systems). It’s easy to keep up to date as long as you don’t try to modify the way it works or overloads it with non-standard plugins.
With cPanel you can:
- Link domain names to your site
- Set up emails for your site
- Install content management systems (CMS) like WordPress or Joomla
- Back-up your website
- Upload or Download files or images
- Check your bandwidth usage
and a lot more advanced bells and whistles, plus some nifty security gadgets.
How to get started with cPanel?
Once you’ve bought your cPanel hosting package from HOSTAFRICA, you’ll receive an email with login details for your cPanel site. This can be in the form of an IP address (eg. 123.234.123.234:2083) or a domain name (i.e. https://yourdomain.co.za:2083). Once you navigate to this address with your browser, you’ll get the cPanel login page. Enter your username and password and your cPanel will pop right up.
Almost every page of cPanel has a documentation link or a help button of some kind.
The interface
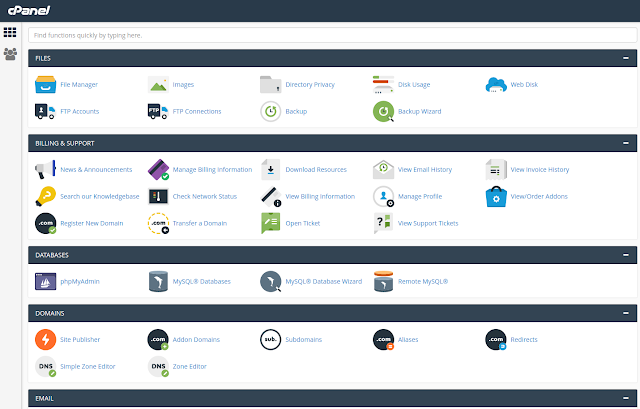
The first screen you’ll see after you login normally looks more or less like the picture above. At the top of the cPanel is the search bar – typing in a word or two of what you need and cPanel will bring it up for you.
The same search feature is at the top right in the navy blue login bar and can be accessed from any page.
Any time you need to return to this page, hit the icon pad at the top left below the word cPanel.

Clicking on your username at the top right, gets you a drop-down menu like the image below. Here you can reset your password, change the language and style, add contact information to receive emails, and reset your settings to default.
Make sure your contact details are up to date so that cPanel can inform you of important events and suspicious activity (such as someone attempting to log on with your username).
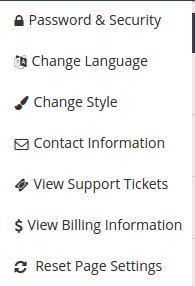
It’s best to tick all options in the “Contact Information” panel. This way you’re certain to not miss anything important.
Adding users
You can add users with the user icon on the top left of the page. This can be a web-designer, business partner, or anyone who has a legitimate reason to log on to your cPanel. This goes without saying, but we’ll mention it just to be sure: Do not give user permissions to anyone unless they’re part of your team. Remove users when they leave your employ or have finished the task for which they had access. It’s better to keep the admin circle small.

Under the user manage tab, the Envelope enables email, the Delivery Truck indicates FTP access, and the Disk-Drive indicates access to web-disk services.
Choosing a password
Undoubtedly one of the most important decisions you can make as far as securing your cPanel installation. A secure password is more than just a random combination of characters. It must be something you can remember, without being easy to guess or crack by computer. The single most important factor that makes a password secure is length. Twelve characters or more is ideal.
The challenge is formulating a password that’s long, but easy to remember as well. Our recommendation is: use a phrase that you can relate to. You’ll add an extra layer of trickery if you use a non-English language. Take a look at this example.
Start with the phrase:
my dog eats a lot = 13 characters
Modification #1 – replace letters with numbers – first ‘o’ becomes zero (0)
my d0g eats a lot
Modification #2 – replace ‘s‘ with $
my d0g eat$ a lot
Modification #3 – every other word starts with a capital letter
My d0g Eat$ a Lot
Modification #4 – add your own touch (we used ‘#75′)
My d0g Eat$ a Lot #75
Modification #5 – remove spaces
Myd0gEat$aLot#75
Now you have an extremely complex password that is difficult to crack.
Managing Domains
The ‘Domains’ section is where you add a domain name you’ve purchased to your hosting account, manage sub-domains, or redirect a domain you own to another site.
A ‘sub’ domain is anything that comes before the domain name. Thus ftp, mail and www are all examples of sub-domains.
New Domains
Click on ‘Addon Domain’ to add a completely new domain for which you can create a new website.
Under Addon Domains, you’ll be asked to enter your new domain name, sub-domain and document root. Your ‘New Domain’ is the domain name without the www part. The sub-domain creates a sub-part for the main domain which automatically redirects to the main domain i.e. www. Your domain will reside in the document root section on the cPanel server.
It’s usually best to stick to cPanel recommendations, especially if you’re just starting out. Best to leave any complicated plugins and additions for when you know exactly what is is they do, and what you want from them.
cPanel file manager
This section of cPanel is where you upload the files and images you want to have on your website. A few pointers: the ‘Home’ page is always called ‘index.htm’, ‘index.html’ or ‘index.php’ depending on your server setup and web programming language. Ensure that your images are optimised and stick to .jpg/.jpeg, .png or .gif. BMP images are generally too big and load slowly. You can optimize images with Photoshop, GIMP or online tools like optimizilla, dynamicdrive imageoptimizer or compressor.io.
As far as folder structure is concerned, the main folder which contains your main site files is public_html. Be careful here as any changes WILL change your website.
Files can also be uploaded via FTP, but you’ll have to add an FTP account first. Remember to define the FTP user ‘home’ directory to keep the user from seeing all your files and folders. Also, define a quota to limit the total size or space used by the FTP users as going over your total assigned quota can freeze your cPanel account, preventing email access and possibly disabling all your websites as well.
Email accounts
Here you add email accounts for the domain you have created. Besides adding accounts, some other nifty features include adding auto-responders and anti-spam measures to lessen junk-mail.
You’ll want to be careful when setting up auto-responders. Only set them up for when you are unable to reply. An automated message can be seen as insincere sometimes, so don’t overuse it. Set them to reply only once per week to the same email address. Auto-responders are often abused by spammers and can get your server blacklisted. You can also access web-based email by using http://yourdomain.co.za/webmail .Setting up anti-spam is done via Apache SpamAssassin in the email section.The higher the score, the more spam is allowed through. If you lower the score below 5, you may get some valid mail blocked. You can also choose to have spam deleted or only flagged and sort it with Outlook, which is a safer option.
Backups
Regardless of what backup strategies your hosting provider follows, the final responsibility for keeping your data safe lies with you. Luckily, cPanel makes this easy with their ‘Backup Wizard’. A monthly backup offsite is a feasible safety measure so that you have the extra redundancy plan.
Software
cPanel has a number of easy installs via Softaculous Apps Installer. Here you can install CMS software like WordPress. Don’t attempt to install everything you might need as each module uses space and will slow down your site slightly. Each additional module also introduces new possible vulnerabilities for internet criminals to target.
Ensure that you run all updates regularly to keep your site as safe as possible. Also, get the advice of a cPanel or WordPress expert on securing your site.
Happy Hosting!
